The idea of this post is to show how you can deploy a basic TensorFlow architecture to train a model, using AWS and the tool Infrastructure Manager. All the code and scripts are on GitHub.
We want to deploy a similar architecture to this:

We are considering here just with the training part, and I’m working on using a serverless solution for the inference. We need two roles, as we are just using MNIST, so we don’t really need the sharding data part. We need:
- Parameter server (PS): Node(s) that initializes parameters, distributes them to the workers, gathers the gradients and then applies them, and scatters them back to the workers.
- Model replicas (MR): Nodes that store the graph and that carry on the forward and the backward, sending finally the updates to the PS.
We call worker nodes to the model replicas, to be consistent with the code provided on GitHub, we are providing the necessary scripts and also a piece of software to try the distributed deployment.
Deployment and provisioning with Infrastructure Manager
To solve the proposed problem, we will use the tool Infrastructure Manager (IM), created at Universidad Politécnica de Valencia, to deploy distributed systems, using Ansible to provision them, in a cloud-agnostic way. We are using AWS in this project, but the scripts could be easily adapted to a different cloud-provider platform such as Azure.
IM Command Line Interface Installation
We will create a Python’s virtual environment to work properly (if you are not familiar with virtual environments, you can check this link). The commands to do this are enumerated below:
mkvirtualenv −−python=/usr/bin/python2.7 im_env
 > workon im_env #Get into the virtual env
(im_env)>(im_env)
Finally, to install IM:
(im_env)>pip install IM−client
It is required to configure a couple of files in order to work with IM:
- im.client.cfg: Contains the initial parameters to configure the client, as the endpoint of the IM server.
- auth.dat: Contains the credentials for logging in to the cloud platform. In this case, we need ACCESS_KEY and SECRET_KEY from AWS.
Generating the RADL file.
We need one Resource and Application Description Language (RADL) file that will define our system, as well as the Ansible scripts/roles required. The file could be found on my GitHub, and I’m going to describe the different parts that compose the structure of this kind of files.
First of all, we need to indicate the network parameters, these lines are present at the top of the file:
 network publica (

 outbound = ’yes’ and

 outports = ’2222/tcp−2222/tcp ,22/tcp−22/tcp ’ and

provider_id = ’vpc−83a213fb.subnet−2bfb6c4f ’)
We are indicating here that we want a network called “publica” with world visibility by setting the outbound parameter to ‘yes’, and this set of ports, to access from outside with SSH and to communicate with the other nodes. We are indicating in the provider_id param the number of the vpc (private network in AWS, it should exist in the platform) and the subnet where the nodes will be.
The second part of the file is the following:
system ps (

net_interface.0.connection = 'publica' and

net_interface.0.dns_name = 'ps-#N#' and

disk.0.image.url = 'aws://us-east-1/ami-7dce6507' and

instance_type = 't2.micro' and

disk.0.os.name='linux' and

disk.0.os.credentials.username='ubuntu' and

disk.0.applications contains
(name='ansible.modules.git+https://github.com/JJorgeDSIC/ansible-role-tf|tf_node') and

disk.0.os.credentials.public_key = 'user-keypair' and

disk.0.os.credentials.private_key = '-----BEGIN RSA PRIVATE KEY-----...-----END RSA PRIVATE KEY-----')
This fragment is related to the technical characteristics of the nodes, and it is defined:
- net_interface.0.connection: Kind of connection, we use the network “publica” that we have created.* net_interface.0.dns_name: Node’s name, it will be injected in the nodes in the /etc/hosts file, and it could be parametrized as it is shown here to take values from 0 onwards with the syntaxis #N#, resulting in ps-0, ps-1,…,etc.
- disk.0.image.url: Disk image, we picked Ubuntu 16.04.
- instance_type: The image that will be used, for this example we just use t2.micro from AWS.
- disk.0.os.credentials.username: The user that will be created in the machine, who can access the node.
- disk.0.applications contains: The Ansible role that we will need, in this case we are using the role that is published in my GitHub, indicated as: ansible.modules.git+link_to_repo | role name.
- disk.0.os.credentials.public_key, disk.0.os.credentials.private_key: Public and private key to access without the password to the nodes in the deployment.
After this, we need to contextualize the nodes and to provision them. For doing this, we define:
 configure ps (

@begin

- vars:

    ps_nodes: 1

    worker_nodes: 2

roles:

 - role:

    tf_node

@end

)
When we are expressing that we have two variables, ps_nodes indicating that there will be 1 PS server and worker_nodes indicating that 2 worker nodes will be deployed, and we use a common role called “tf_role”. The last lines indicate that we deploy 1 PS and 2 worker nodes, as we indicated before.
deploy ps 1

deploy worker 2
With this, we just have to run the client like this, assuming that the name of the RADL file is “tensorflow.radl”:
 (im_env)> im_client.py -a auth.dat create tensorflow.radl
 Secure connection with: https://servproject.i3m.upv.es:8899 Infrastructure successfully created with ID: \ccf83554 −3f23 −11e8 −8694−300000000002
Some interesting commands are shown underneath, to check and control different parts of the deployment, for instance to destroy the infrastructure:
 (im_env)> im_client.py −a auth.dat destroy \
ccf83554 −3f23 −11e8 −8694−300000000002
Secure connection with: https://servproject.i3m.upv.es:8899 Infrastructure successfully destroyed
Or to list them:
 (im_env)> im_client.py −a auth.dat list
Secure connection with: https://servproject.i3m.upv.es:8899 Infrastructure IDs:ccf83554 −3f23 −11e8 −8694−300000000002
They could have three different states:
- Running: When the process of deployment and provision is until running.
- Unconfigured: Something went wrong and the process was not completed.
- Configured: Everything went well, and the infrastructure was created successfully.
A example of calling the “getstate” option:
 (im_env)>im_client.py −a auth.dat getstate\ ccf83554 −3f23 −11e8 −8694−300000000002
Secure connection with: https://servproject.i3m.upv.es:8899The infrastructure is in state : running
VM ID: 1 is in state: running.
VM ID: 0 is in state: running.
VM ID: 2 is in state: running
We can get this with more detail, getting the provisioning messages:
 (im_env)>im_client.py −a auth.dat getcontmsg\
ccf83554 −3f23 −11e8 −8694−300000000002
Secure connection with: https://servproject.i3m.upv.es:8899Msg Contextualizator :  2018−04−13 2018−04−13 2018−04−13 2018−04−13 2018−04−1315:27:38.498479: 15:27:38.500072:
Or about one particular virtual machine:
 (im_env)>im_client.py −a auth.dat getvmcontmsg\

ccf83554 −3f23 −11e8 −8694−300000000002 0

Secure connection with: https://servproject.i3m.upv.es:8899

Contextualization agent output processed successfully

Generate and copy the ssh keyLaunch task : basic

Waiting SSH access to VM: 54.173.222.164

Testing SSH access to VM: 172.31.13.120:22

Remote access to VM: 54.173.222.164 Open!

Removing requiretty to VM: 54.173.222.164OUT:Requiretty successfully removed Call AnsiblePLAY [54.173.222.164   1 ] ∗∗∗∗∗∗∗∗∗∗∗∗∗∗∗∗∗∗∗∗∗∗∗∗∗∗∗∗
From this point, we can focus on the Ansible role, that has an important part to do during the deployment. I will comment some details of this file.
Ansible Role
We want to install Python3, Git, pip, jupyter and TensorFlow. For doing this, we used the following script:
- name: Install Python3-dev tools
apt: pkg=python3-dev state=latest update_cache=yes
- name: Install Git
apt: pkg=git state=latest update_cache=yes
- name: export language and locales
shell: export LC_ALL="en_US.UTF-8";
export LC_CTYPE="en_US.UTF-8";
sudo dpkg-reconfigure locales
- name: Upgrade pip
pip: name: pip state: latest executable: pip3
- name: Install Jupyter
pip: name: jupyter state: latest executable: pip3
- name: Install tensorflow 1.4
pip: name: tensorflow version: 1.4 executable: pip3
- name: Copying template
template: src=distributed_example.py.j2
dest=/home/ubuntu/distributed_example.py
- name: Execute Script
command:
python3 distributed_example.py > results.txt
args:
chdir: /home/ubuntu/
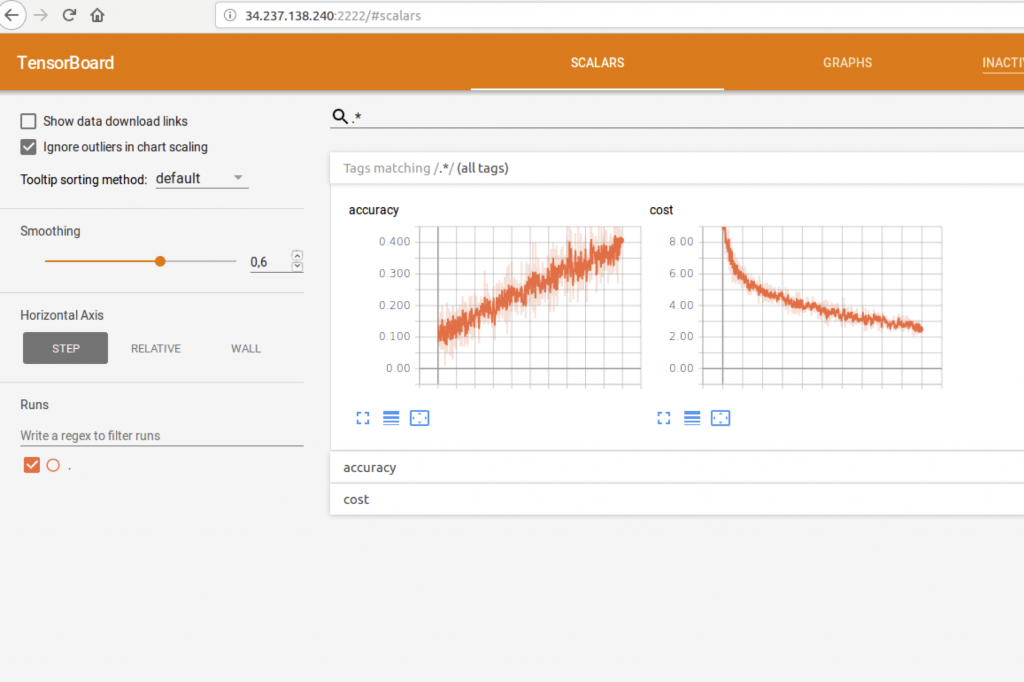
- name: Display results in Tensorboard (visible at ip:2222) command: tensorboard --logdir=/tmp/mnist/1 --port 2222
args:
chdir: /home/ubuntu/
We are defining different tasks with a name, the command to run, some apt and pip commands. The last three tasks are:
- Copying the training file’s template, filling the parameterized values.
- Launching the training.
- Launching tensorboard.
The distributed example should be in the template folder (where the static files that the role needs are), and the running commands to perform the training and then to show the results with Tensorboard. This parametrized part of the file is the following:
 parameter_servers =
{{
lookup('sequence', 'start=0 count={{ ps_nodes }}
format=ps-%d:2222',
wantlist=True)
}}
workers = {{
lookup('sequence', 'start={{ ps_nodes }}
count={{ ps_nodes + worker_nodes - 1 }}
format=worker-%d:2222',  wantlist=True)
}}

 {% if ansible_hostname.startswith("worker") %}
   task_index =
      {{ ansible_hostname[-1] | int}} - {{ ps_nodes }}
   job_name =
      "worker"
  {% else %}
   task_index =
      {{ ansible_hostname[-1] | int}}
   job_name = "ps"
  {% endif %}

 cluster =
  tf.train.ClusterSpec(
    {"ps":parameter_servers, "worker":workers})
This generates a list of values of the format pd-NUM:2222 in the case of the PS, and worker-NUM:2222 in the case of the workers. After this, the task index and the job name, that identify which part of the training the node should perform, it is filled according to the variables that we defined previously in the RADL.
Execution example
All this code is available at GitHub, and after doing all the steps and preparing the files, the output should be similar to this one:
 (im_env)> im_client.py −a AUTH/auth.dat create \
   RADL/tensorflow.radl

Secure connection with: https://servproject.i3m.upv.es:8899 Infrastructure successfully created with ID:0873978c−3f3−11e8−8694−300000000002

(im_env)>im_client.py −a AUTH/auth.dat getstate\ 0873978c−3f3c−11e8−8694−300000000002

Secure connection with: https://servproject.i3m.upv.es:8899

 The infrastructure is in state: running

VM ID: 1 is in state: running

VM ID: 0 is in state: running

VM ID: 2 is in state: running

(im_env)>im   client.py −a AUTH/auth.dat getinfo

0873978c−3f3c−11e8−8694−300000000002 | grep net interface .0. ip net net_interface.0.ip = '34.205.81.59' and
net_interface.0.ip = '34.237.138.240' and
net_interface.0.ip = '54.236.35.13' and
These are the nodes’ IPs, so you can reach them by SSH. If you want to check the status, you can execute:
 (im_env)> im_client.py −a AUTH/auth.dat getcontmsg \

0873978c−3f3c−11e8−8694−300000000002

Secure connection with: https://servproject.i3m.upv.es:8899

...

TASK [ tf   node : Copying template ]

 changed: [34.237.138.240_2]

TASK [ tf   node : Execute Script ] ∗∗∗∗∗∗∗∗∗∗∗∗∗∗∗∗∗∗∗∗∗∗∗∗∗∗∗∗∗∗∗∗∗∗∗∗∗∗∗∗∗∗∗∗∗

changed: [34.237.138.240_2]

TASK [ tf   node : Display results in Tensorboard ( visible at ip\:2222)] ∗∗∗∗∗∗∗∗∗∗∗∗∗∗∗∗∗∗∗∗∗∗∗∗∗∗∗∗∗∗∗∗∗∗∗∗∗∗∗∗∗∗∗∗∗∗∗∗∗∗∗∗∗∗∗∗∗∗∗∗∗∗∗∗∗∗∗∗∗∗∗∗∗∗∗∗∗∗∗∗∗∗∗∗∗∗∗∗∗∗∗∗∗∗∗∗∗∗∗∗

...
And we can check the results in tensorboard by connecting to NODE_IP:2222, as it is shown underneath: